
Give the next step a place in the picture.
A short callout can name a detail or leave the viewer with one action. Make it useful on a phone: brief wording, a readable size and a clear relationship to the scene. Remixure’s scene graphics add private image graphics, editable text, shapes and charts over your image, footage or solid background.
Give a supplied comment or next step its own card.
Open Add a comment or call-to-action card in the studio. For an Attributed comment, enter permitted wording, who wrote it and a visible source credit. Use up to 120 characters of wording, 48 for the writer and 60 for the credit. Keep the complete original source separately. This creates an original card; it does not import a social post, recreate a platform interface or supply a customer testimonial. Our demonstration wording, “Could you show the first step?”, is labelled Original example and Authored for this demonstration.
For a Call to action, enter one next step, an optional supporting detail of up to 80 characters and an optional visible destination or credit. “Try the first step” with “Write one clear sentence” is a planning example. Do not invent a price, discount, deadline or promised result. An address shown in an MP4 is plain wording, not a clickable button.
- Choose Card duration within 1–30 seconds in 0.1-second steps, then select Review scene card. Shorten text when the proposed format cannot keep it readable. Line breaks and repeated spaces become single spaces.
- Compare the complete card with your original. Check attribution, permissions, claims and reading time, then confirm the review. Changing a field clears the proposal and confirmation.
- Select Apply scene card to append one ordinary scene. Earlier scenes and caption times stay fixed. Discard scene card clears only this plan; one Undo restores the previous video after applying.
- Preview the full picture and sound, then Save video as a new version. Review pauses autosave and Apply keeps it off. Recordings may end before the card; looping music and end fades follow the new end.
Once applied, the panel, accent and labels are editable under Scene graphics. Save, Check export, then watch the whole MP4 before sharing. If you previously removed speech timing, restore that separate cleanup before appending a card.
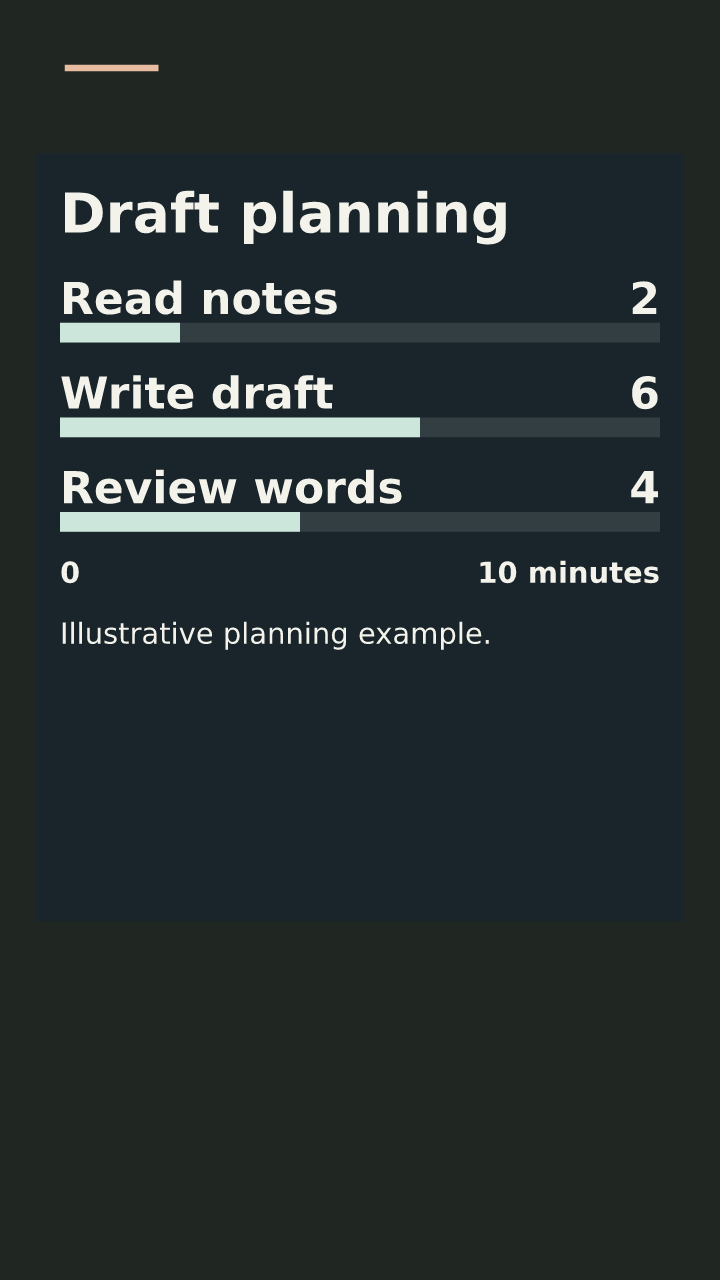
Watch a fade and two short slides.
This original six-second example uses three two-second scenes. Each callout arrives over 0.8 seconds, then stays still so the words have time to be read. It has no audio.
- Start small. fades in.
- Give the detail a place. slides from the left.
- Let the words settle. slides from above.
Use left 10%, top 12%, width 80% and height 12% for each text graphic. Choose a 0.8-second animation and a whole-scene visible range. Play the example, then try those settings on a scene of your own.
Download the example MP4 (54 KB) · Download its scene settings
Move and resize a graphic, then apply one edit.
- Choose the graphic under Scene graphics and select Edit graphic layout. Playback and autosave pause. All graphics show their settled geometry without entry, exit, visibility windows or word reveal. This temporary view is never saved or exported.
- In Move mode, drag the outlined box, or focus it and use arrow keys for 1% position steps. In Resize mode, drag the corner handle, or focus it and use arrow keys for 1% width/height steps. Resizing starts at the current top-left and allows a free box shape; it does not lock proportions.
- Review Left, Top, Width and Height beside their original values. Whole percentages stay inside the full frame. Graphics need at least 10% width and 5% height; charts need 50% width and 30% height. Apply stays blocked if text or chart labels cannot fit: enlarge the box or Discard to return to the original.
- Discard graphic layout leaves the video unchanged. Apply graphic layout changes only this graphic's position and size in one edit; one Undo restores both. Wording, chart values, colors, target text size, private image fit, timing and sound retain their existing values. Text wraps and can shrink to fit; image contain/cover still controls the picture inside its box.
- After Apply, preview the actual entry, exit, captions and sound, then Save video for a new version. Autosave stays off. If the video changes during review, discard the stale proposal and reopen the current graphic.
Numeric position/size controls remain available outside layout review. Moving uses the proposal's current size. Cancelling an unfinished pointer gesture restores its starting proposal; Discard leaves the whole proposal. This workflow does not create keyframes or rotate graphics.
Choose any of the four slide directions.
In Graphic animation, choose Slide from right or Slide from below as well as left, above or Fade in. In Graphic exit, choose right, downward, left, upward or Fade out. Entry settles at the saved position; exit moves away from it. Each slide travels 12% of the full frame, over 0.2–2 seconds in 0.1-second steps. This moves the complete image, text, shape or chart; chart values and individual words keep their own behavior.
Use the start and midpoint preview buttons, then leave settled time to read the graphic. Entry and exit can overlap: their translations add, so opposite directions can cancel. Splitting retains progress. Changing an effect, duration or time range restarts that entry or anchors that exit to the new visible end. One Undo restores the previous edit. Save a new version and watch its MP4.
If rightward and downward motion are temporarily unavailable, saved effects remain readable. Change each affected entry and exit to None, Fade, Left or Up and save a new version, or return when available. This does not change the original image or chart data. Automatic paths, bounce, easing curves and numerical chart animation are separate work.
Carry a scene style through the video.
Set the current scene’s background, text and accent colors with a swatch or six-digit hex value, and choose its layout. Open Copy scene style, choose the settings to copy and select the other scenes. Select all other scenes includes every other scene; clear the selection to choose a smaller group.
Review style changes shows the exact colors or layout and each scene that would change. Autosave pauses. If you edit the video or change the source scene, review again before applying. Apply style changes makes one draft edit, and one Undo restores the affected scenes. Save a new version to keep it, then watch its MP4.
Only the selected scene colors or layout change. Scene wording, supporting lines, media, graphics, transitions, captions and soundtrack retain their own settings. A graphic’s colors are separate from the scene colors. Discarding the review leaves other edits intact; an already matching selection changes nothing.
Keep a logo or product image above the scene.
- Choose the scene and select Add image graphic under Scene graphics. In Reuse workspace media, choose a private PNG or JPEG, inspect it, confirm your permission and select Add as image graphic. Upload a file to the library first if needed.
- Set the graphic’s position and size. Contain shows the full image; Cover crops it to the box. Transparent PNG areas stay clear, without a tint. This adds an image above the background; Use in this scene instead replaces that background.
- Set opacity, a visible time range, entry or exit as needed. Use Send backward or Bring forward to order graphics. Captions remain above them. Preview the settled image on a phone.
- To replace the file, confirm permission in the image graphic’s controls and choose Graphic image. Undo restores the previous file and settings. Save a new version, export and inspect the MP4.
The stored original remains private and unchanged. Splitting preserves visibility and motion; historical saved versions protect referenced images from unused-media removal. Image graphics support original videos up to 60 seconds at 720p or 30 seconds at 1080p. Each reused file counts once toward the 12 MB source-media limit. If exports are unavailable, remove all image graphics and save a new version, or return later. Custom fonts, automatic brand-kit logos and AI product-fidelity claims are separate work.
Start with one callout.
- Choose the scene, open Scene graphics, and select Add text graphic.
- Replace Graphic text with a short instruction such as “Try one page tomorrow.” Text can contain up to 120 characters. A separate text color and background color control its contrast.
- Set Left, Top, Width and Height as percentages of the complete frame. For a top callout, try left 10%, top 12%, width 80% and height 12%.
- Choose a target text size. Text wraps and shrinks to fit, down to 12 pixels at the 720p size. Enlarge the box or shorten the line if it still cannot fit. Watch the phone-sized preview instead of relying on that minimum.
- Save the version, export and inspect the completed MP4. Graphics remain visible for the scene’s whole duration unless you choose a time range.
Left plus width and top plus height must stay within 100%. Width starts at 10% and height at 5%; use whole percentages. A change of format can require more room for the text.
Choose a font for each graphic.
Watch and rebuild the six-second bar, line and pie example, then pause each chart to compare the values and complete source notes. Its editable download starts with a catalog face; using a private font needs a separate permitted original and review.
Select the callout or chart under Graphic, then choose Graphic text font: Sans, Serif or Mono. The choice applies only to that graphic. A chart uses it for its title, labels, values, scale or total and source note, with regular and bold weights where needed. Scene wording and timed captions keep their own fonts.
Inspect the preview after changing the family. Wrapping and fit use the exact bundled font; a wider family can need a larger panel or shorter text. Unsupported characters stop saving instead of silently changing the font. The chosen wording, numbers, visible range, reveal and entry/exit settings remain. Save a new version, export and watch the completed file; one Undo restores the previous font.
If the font file cannot load, use Retry text fonts or choose Sans. If graphic fonts are temporarily unavailable, saved choices remain readable: reset every text and chart graphic to Sans and save a new version, or return later. This fixed catalog uses bundled originals and no remote font URLs.
For a permitted private face, open Use a private text font and select the callout or chart in Private font text target. Reuse a workspace original or choose one supported static regular or bold TTF up to 1 MiB. Inspect the proposed text, confirm permission and readability, then choose Apply private text font. Each target needs its own review. One exact private original may be shared across charts, callouts, scene wording and timed captions. Chart text uses the supplied weight throughout; there is no synthetic bold. Preview the full video, then save and inspect its MP4. One Undo restores the previous font; selecting Sans, Serif or Mono removes the selected private font. See the private-font limits and recovery guide.
Use a shape to mark or separate.
Select Add rectangle or Add ellipse for a solid shape. An ellipse can mark a detail; a rectangle can separate a callout from a busy background. Set its position and color, then adjust Graphic opacity. Opacity affects the entire graphic, including text in a callout. A rectangle does not cut out the underlying image.
Enter a six-digit hex color to match a brand, or use the color swatch. Check that the text remains readable over every image in the scene. A nearly transparent callout is a poor place for a material disclosure.
Let a callout arrive at the right moment.
Select the graphic and check Use a time range for this graphic. Set Graphic start and Graphic end within that scene, in 0.1-second steps. The graphic appears at its start and disappears at its end. For a two-second scene, a 0.5–1.5-second range leaves a moment before and after the callout.
Preview graphic start holds that moment without editing the video. Use Preview position to scrub around the boundary; Pause holds footage, captions and fades, and Play continues from there. Uncheck the time range for a whole-scene graphic. If you shorten the scene, adjust ranges that extend past its end before saving.
When timed graphic exports are unavailable, existing ranges remain in your draft. Set every timed graphic to the whole scene and save a new version to export without timing, or return when it is available. Undo restores the previous range. A time range sets visibility. Choose an entry animation separately to fade or move the graphic.
Animate the entry, then let the words settle.
- Select the graphic and choose Fade in, Slide from left or Slide from above under Graphic animation, when available in your workspace.
- Set Animation duration from 0.2 to 2 seconds, in tenths. The entry begins at the graphic's time-range start, or the scene start if it uses the whole scene.
- Use Preview animation start and Preview animation midpoint. The midpoint stays within the current visible window, including a short scene. Scrub or play the preview to judge how the entry meets the footage.
- Save, export, and watch the actual MP4. Choose None to remove animation while keeping the graphic's position and visible range.
A fade increases the graphic's existing opacity linearly. A slide travels 12% of the frame toward the chosen final position; it can clip at a frame edge while moving. A short visible range can finish before the entry does. Leave enough settled time to read the callout, and keep disclosures readable throughout.
Splitting preserves motion progress. A partially completed entry continues in the second half; a completed entry stays still there. Changing its effect, duration or visible range restarts that graphic's entry. If animation exports become unavailable, saved settings remain readable: choose None for every animated graphic, then save a new version to export without animation.
Choose how the graphic leaves.
Under Graphic exit, choose Fade out, Slide to left or Slide upward, when available. Set an exit duration from 0.2 to 2 seconds. It ends with the graphic’s visible window or scene; slides cover 12% of the frame.
Use Preview exit start and Preview exit midpoint to check readability. Short windows can start partway through an exit, and an entry can overlap it. Splitting preserves the original exit progress. Changing the effect, duration or time range anchors it to the current end. If exit exports become unavailable, choose None for each exit and save a new version.
Reveal a callout one word at a time.
For a text graphic, choose Word by word under Text reveal, then set Reveal duration from 0.2 to 3 seconds in tenths. The first word appears at the graphic's start; the remaining words join in their final positions without moving earlier words. All appear by the chosen duration. A shorter visible range can end early, so leave time to read the completed sentence.
Preview reveal start and Preview reveal midpoint hold the chosen moment and bring the preview into view. Splitting preserves progress. Editing the words, duration or time range restarts the reveal. Entry/exit animation remains a separate choice.
Use up to 24 words per callout and 96 across the video, with original videos up to 60 seconds at 720p or 30 seconds at 1080p; tighter cut/dissolve limits still apply. This is authored timing, not speech alignment. Choose None to show all words. If reveal exports are unavailable, words and settings remain; choose None for each reveal and save a new version, or return later. Undo/history recover it. Watch the original four-second example and download its editable settings.
Keep the order intentional.
Choose an item under Graphic to edit it. The list runs from back to front: the last graphic sits above earlier ones. Send backward and Bring forward change that order. Graphics appear above the scene’s main text; timed captions stay above all graphics. Leave room for both instead of covering them.
Remove this graphic removes the selected item. Remove all scene graphics clears this scene. Undo restores the previous edit. Duplicated scenes keep their graphics. Splitting intersects and rebases timed graphics so they appear at the same moments across both halves, and you can edit the new scene independently. The original image or footage stays unchanged.
Show your numbers with a shared scale.
Try the free bar chart video planner first. Compare your labels, values, source and scale, then import its editable document into the studio.
Select Add bar chart, when available, to place a chart over the scene. Its starting values are illustrative. Replace the title, labels and numbers with your own data; use the same unit and basis for every bar. Enter two to six bars and a positive Chart scale maximum that covers every value. Bars always begin at zero. Values allow up to two decimal places, from zero to 1,000,000.
Use Chart unit to explain the scale, such as minutes. The optional Chart source or note appears in the video: enter a source, date or short qualification yourself. Remixure does not retrieve or verify the numbers. The maximum stays fixed when a value changes, so two versions can retain the same scale.
The starting panel uses left 5%, top 12%, width 90% and height 60%. Chart text and bar colors are separate from the panel color. A chart needs at least 50% width and 30% height, with enough additional room for all its words. Text shrinks to fit; if it cannot fit, saving stops with a correction. Enlarge the panel, shorten the wording or use fewer bars. Check that the panel leaves no unintended fragments of the main scene headline visible around it.
Time ranges and entry animations affect the complete chart. A fade or reduced opacity can reveal the words underneath it; preview that overlap and leave settled time to read the data. Splitting keeps its numbers, scale and current animation progress. A chart counts as one of the six scene graphics. If chart exports become unavailable, saved data remains: remove every chart and save a new version to export without charts. Undo restores a removed chart.
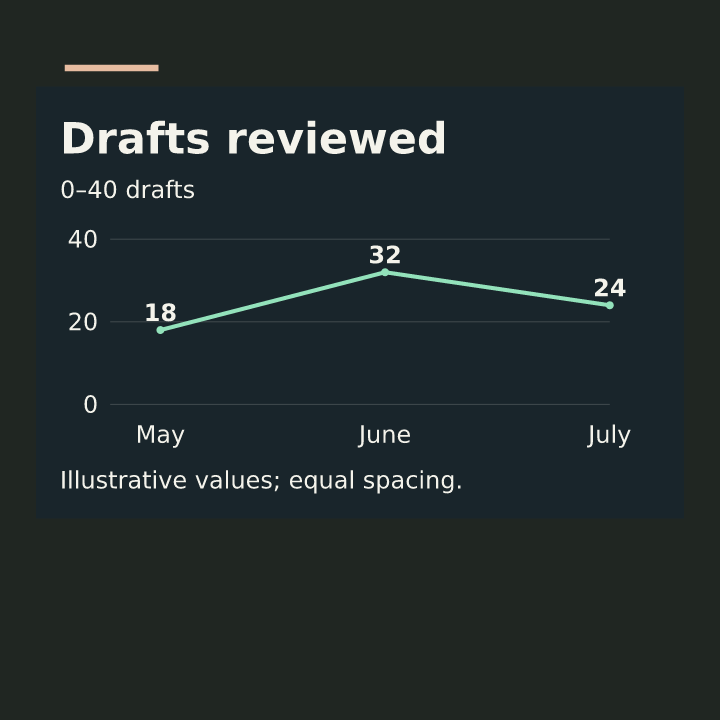
Connect an ordered series with a line.
Select Add line chart, when available, and enter two to six points. Replace the illustrative title, labels, values, unit and source note. Keep a positive Chart scale maximum above or equal to every value; the vertical scale always begins at zero. The line connects points in the order you enter them, with equal spacing. Dates are labels: a gap from May to June occupies the same space as a gap from June to December. Use this chart for comparable ordered observations, and explain the basis in your source note.
For the example below, enter May 18, June 32 and July 24 drafts, with a maximum of 40. Use left 5%, top 12%, width 90% and height 60% in a square video. Choose a separate Chart line color and readable text and panel colors. The grid, every value and the source stay visible; the renderer never smooths or predicts a trend. Remixure does not retrieve or verify the numbers.
Time ranges, entries, exits, splitting and Undo work on the complete chart. Preview the settled chart, save a version and play its MP4. A line chart counts as one graphic. If line-chart exports are unavailable, saved data remains: remove each line chart and save a new version to export without it. Bar charts and other available graphics can remain.
Show the parts of one total.
Select Add pie chart, when available. Replace its illustrative values with two to six non-overlapping parts of the same complete total. For a writing-time example, enter Outline 35, Draft 65 and Review 0, with a common unit of minutes. The circle shows 35% and 65%; Review remains in the legend at 0%. Use a bar chart for independent comparisons and a line chart for an ordered sequence.
Edit the title, category labels, values and individual colors. Values allow two decimal places, from zero to 1,000,000, and at least one must be positive. The panel shows the sum, every raw value and each share rounded to one decimal place; rounded percentages may not add to exactly 100%. A single positive category fills the circle while zero categories remain visible in the legend.
Add an optional Pie chart source or note to explain the basis, date or qualification. This is your supplied text; Remixure does not verify it. Keep the colors distinguishable and check the printed labels rather than relying on color alone. Enlarge the panel, shorten its wording or reduce the categories if they cannot fit. The default panel is left 5%, top 12%, width 90% and height 60%.
The complete chart uses the same time range, entry and exit controls as other graphics. Save and watch the exported MP4 to check all values and source text. If pie-chart export is unavailable, saved data stays readable: remove the chart and save a new version to export without it, or return when available. Undo restores it.
Know what belongs to this version.
Use up to six graphics per scene. Text, solid shapes, horizontal bar charts, ordered line charts and pie charts use percentage positions and the fixed Sans, Serif or Mono catalog, with optional bounded fade or slide entries. There is no area/scatter chart, numerical time axis, arbitrary SVG/code or remote font URL. A separately reviewed private static TTF can be used for callouts and chart text within the private-font limits. Bounded fade or slide exits are available when configured. Graphics are burned into the saved version’s MP4; subtitle downloads still contain the scene or timed-caption words.
If graphic exports are temporarily unavailable, the editor retains your saved graphics. Remove them and save a new version to export without them, or return when the capability is available. Undo can restore them. Follow the short-video workflow and caption guide to review the complete picture.
Add a callout in the studio →